
Your air compressor is not building pressure perfectly and sometimes it continue running but doesn’t produce pressure, Is it? Definitely, there would be a problem with your reed valve. It may be broken or become dirty which is causing low compression and malfunctioning. Here we will tell you how you can clean the reed valve properly and what are the best solvents to wipe out all the dirt from the valve.
All About Reed Valves
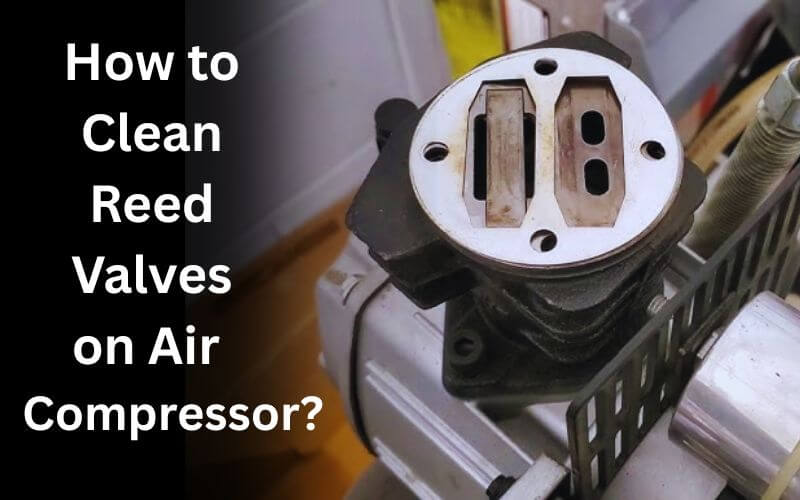
A Reed valve is a piece of metal available in the air compressor pump to control the airflow. It allows and restricts the air into the pump that helps in building pressure in the tank.
Every compressor company makes its own style of reed valve but the traditional design is like a metal bar that will easily fit on the plate. You can also make this valve yourself using steel or any other hard foil. We’ve given its whole process at the end.
Working
Reed valve provides a vital job in an air compressor, it controls the intake of the air. When the piston goes up it pushes the air and makes forces on the reed valve. The valve opens and sends the air to the tank. When the piston goes down then the valve seals automatically to avoid any compression loss.
Locating
Almost in every compressor, you will find the reed valve under the top of the air pump, sitting on the valve plate, and above the piston. The number of these valves varies in compressors, some of them have only one and some have two reed valves.
Removing
Finally, you found the place where the reed valve is located. Let’s learn further to remove it for cleaning purposes. The first thing to make sure of before removing the valve is to drain the tank. Now, turn the power switch off and remove all the bolts available on the top of the air compressor.
Put out the head of the compressor pump, there you will see one or two reed valves covered in dirt or debris. This dirt stops the air tool from creating desired pressure. So, let’s clean it to make our device faster.
Cleaning
The dirt available on the reed valve is not easily removed, there is a need for some lubricant that cleans its surface. You can use white spirit or acetone to remove all the dust from the valves. Follow the steps:
- Take a toothbrush and try to clean the dust from it. After that, apply some solvent and start brushing the surface.
- Make sure to clean all sides of the reed valve, also remove the dirt from the valve plate.
- Take a dry cloth and rub the valves and plate firmly with your hands, it will wipe out all the dirt from their surfaces.
- Now, reattach the top of the compressor pump and fit the bolts carefully.
FAQs
How to tell if the compressor reed valve is bad?
You can easily identify if your compressor reed valves are bad or broken.Turn on the compressor and check the pressure level on the gauge, if the machine is not creating pressure accurately, you can say the valve is bad.
When the machine is running, slightly touch the top of the compressor pump. If it is too hot than usual, there is a problem with the reed valve. Furthermore, another symptom of a bad reed valve is your device starts hard.
To fix this issue, check the valve is properly fitted on the plate and there should be no bend on the valve. If it is bent slightly then remove the bends and again place it on the valve plate. Your compressor will start creating ideal pressure.
When should we replace the reed valve on air compressor?
As Reed valve is the essential part that helps the compressor to build a good amount of pressure. If your air tool passes more than 8 years of working, you should check or replace the reed valve. Moreover, after every 30-40 hours job must look over the valve, if it has dirt or is worn out, you should change it.
How to make a reed valve for an air compressor?
If you are not getting the reed valve for your air compressor online then you can also design your own. It will work perfectly, just need some mastery to turn any steel material into the reed valve. Let’s make a valve for my air compressor that includes 5 following DIY steps:
- First measure the length, width, & thickness of the previous reed valve that was broken or not efficient to use. It will help you to create the exact size of the valve that fully fits into the valve plate.
- Take a bit thick steel plate or try to find out old saw in your garage, it would also work perfectly. Because if the steel or any other material is thin, the reed valve may bend and continue creating issues.
- Put your old reed valve on the steel material and mark all the sides with the help of a pen to get the exact length and width.
- When you got the final idea about the size of the valve, cut it with the help of some cutters if available or use a die grinder.
- Check it once by placing it on the valve plate when it comes to the required shape and size. If it fits correctly, it means your reed valve is ready.
- Pro Tip! For making a quality reed valve the best material you can use is Martensitic stainless steel, it will help to prevent rust and last longer.
Bottom Line
We hope this guide will help you to clean the reed valve and your compressor starts working fine. Still, if your device is not starting then try to check the drain valve, or see if there is any leakage. You can share your thoughts below, our experts will quickly assist you to identify the exact issue and solve your problem. Thanks for reading!