
Many of the folks do dusting of their homes after every month or 3-4 months. As you know, home dusting includes cleaning dirt from everything available in your place. When cleaning the kitchen, many people ignore the fridge’s back where coils are available. They think it is dangerous to clean coils, and their fridge may get bad. That’s not the case.
Dirty coils not only reduce your fridge performance but also doubles your electricity bills. Who wants to pay more bills every month? Of course, no one. It also becomes irritating when you see a sudden increase in your electricity consumption, and dusty coils are the main factor from one of those. When this task is performed repeatedly every 2 to 3 months, it decreases electricity bills. So, it is essential to wipe out all the dust to maintain the health and proper working of your fridge.
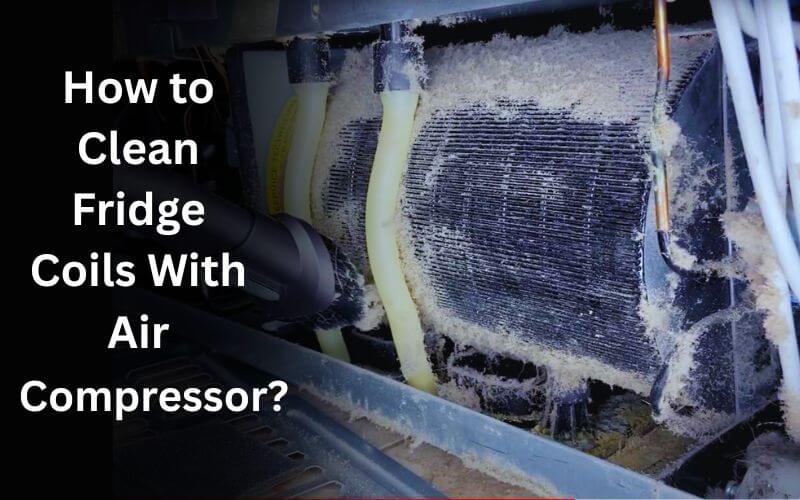
You can use multiple DIY methods to remove dust from coils, but here we are going to use an air compressor for this purpose. Let’s see how we have easily done this.
5 DIY Steps To Clean Fridge Coils Using Air Compressor
We have used simple methods to do this job so everyone can understand it easily. It doesn’t need to hire a handyman or spend bucks; just use the air compressor available in your garage. Follow the steps:
- Step 1: Get everything ready; take the air compressor near your fridge to easily access the coil area. Plug the switch into a wall outlet to power up the compressor. Now, turn on the machine and wait for some time until it reaches the maximum pressure.
- Step 2: Unplug the fridge switch to cut the electric connection. Sometimes, the coils may give an electric shock, so turn off the fridge for safety.
- Now, pull the fridge a little bit away from the wall so you can access the coils easily.
- Step 3: If your fridge has a plastic cover against the coils, remove it first. Now, turn off the compressor if it reaches the cutout pressure. Attach an air blow gun to get a strong airflow. It will help us to remove dust easily.
- Step 4: Always follow the safety measures, and wear a mask to prevent dirt from entering your nose. Wear goggles to save your eyes.
- Step 5: Now, release the pressure from the air compressor. Gently move the air gun in all areas of the fridge coil. The dust starts getting out; repeat the procedure 2-3 times to clean maximum dirt. After that, take a cloth and do the final cleaning with your hands. When the process is finished, move back the fridge towards the wall and turn on the fridge. It’s done!
We also cleaned our fridge coils in the same way; it is safe and will not cause any danger.
Also Read:
How do I keep my fridge coil healthy?
When you clean up the fridge and its coils regularly after 50 to 60 days, it increases the efficiency and life as well. Your device will work more smoothly and save from extra maintenance fees.
Additional advantages to clean coil:
- Increase the efficiency
- Increase life cycle
- Lessen the power consumption
- Less electricity bills
- Quickly build cooling
- Reduces maintenance costs
An Air compressor is one of the effective ways of cleaning dirt. There is also a method that helps to remove dust from coils perfectly.
Alternative Ways to Clean Fridge Coils
If you don’t own a compressor, there is no need to worry; you can use other tools for cleaning. Read the methods below:
Method 1: Clean with Brush
The easiest way to clean coils is by using a brush. Everyone has a brush in their homes, so you don’t need to spend extra money buying special equipment for this purpose. Again, remove your fridge’s power switch and push it away from the wall to access the whole area easily.
Must wear a mask to keep yourself safe from dust. Now, take the brush and start cleaning coils gently. One thing that a brush can’t do is it cannot reach the inside area between the coil and the fridge’s back surface. You have to do this procedure 2-4 times because a brush may miss any part that has dirt. So, when you do it, move the fridge to its right place and plug the power switch. The fridge will again start cooling at the same level when it was new.
Method 2: Clean with a Vacuum
Vacuum cleaners help us a lot in cleaning dirt from rooms, carpets, car seats, and everything that has dust. We will use the vacuum cleaner to clean our fridge coils. In the first step, we will empty the fridge and put out all the goods. Because some freezers have coils on the bottom, so we have to lay it down for cleaning.
Now, turn on the vacuum cleaner and move the top of the hose very close to the coil. It will suck the whole dust within seconds and clean the complete coil. If the coils are on the bottom, lay down the fridge and start cleaning. While laying down, keep in mind that it won’t damage any body part. Put the fridge in its right position and plug in the electric switch. That’s it!
Conclusion
Everyone wishes their appliances would run for more years and they don’t need to buy a new one every year. To maintain the performance and health of your fridge, you have to take proper care of it. It means you need to do an appropriate cleaning of it on time. You can check the whole fridge after every 2nd month; when you see any dust, remove it. This will reduce your bills and add more life to the fridge.
If you love our DIY methods and find this guide helpful, share it with your friends & family. Have any issues? Comment your query below; our experts will help to fix your problem.