
Today, the Air compressor has become an integral part of every carpenter and every home DIYer. If you are new to this world and are first time going to use an air compressor, then you are probably finding a way to wire a 220V air compressor. Generally, an air compressor with 5HP and 60-gallon tank capacity is powered by 220V and needs hard-wiring. It might be a difficult task for a beginner, but with proper knowledge and guidance, you can perform this like a pro.
We bring this article to wire your 220V air compressor successfully. We will go through the necessary steps as well as some safety tips. All we want is to guide you so you can wire your air compressor without damaging your compressor or harming yourself while performing the procedure. Let us explain the process.
The complete procedure for wiring the 220V air compressor
The whole process will include an understanding of the size of wires, types of cables, and switches. To perform the process, you might need the following equipment.
Required Material
- Pressure switch
- Screwdriver
- Blade
- Wire strippers
- Solderless terminals
- Safety gloves
When you collect the required things for the procedure, proceed towards the process.
1. Check out the instructional guide
It is the necessary step before proceeding toward the main procedure. Verify that you have read and understood all of the instructions.Most manufacturers provide a manual or an instruction leaflet so you can read and check how you can wire your air compressor. By following the instructions, decide on a safe place to secure the unit. After this check, the required wire size could vary according to the compressor model and manufacture. It could be 10-gauge or 12-gauge.
2. Select a safe position
The first thing you should do for wiring the air compressor is to place it in a safe place. These air compressors come in more significant and vertical styles. You can build a secure room according to its size. Install a 30 amp plug to connect the air compressor. Adjust the exhaust fan, which will keep the compressor cool while working. It would help if you also placed the thick rubber pad on the floor to isolate the compressor from vibrations.
3. Connect the machine and the switch
There is a pressure switch on each compressor. This switch is necessary to gauge the pressure in the tank. This automatic switch has functioned so that it is turned on/off according to the pressure value in the tank. It usually turns on when the pressure drops below the predetermined value of pressure and turns off when it reaches a lower value of pressure.
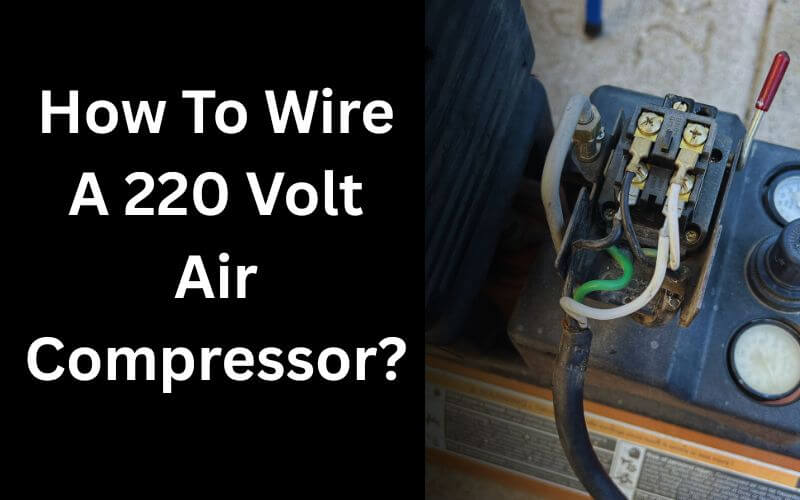
For connecting the switch, you will need three recommended size wires in different colors and for various purposes. These usually have white, black, and green colors. The terminals on the switch are named Motor, Line, and Ground.
Connect the white and black wires to their corresponding brass terminals, as the manual mentions. The green wire should then be hooked up to the ground terminal.Use a 10-12 gauge ring terminal to secure the wires. With the help of a screwdriver, slightly loosen the screws to fix the fork under this and screw it back.
4. Join the circuit with the 220-volt compressor
It’s time to fasten the wires to the air compressor at this point. Open the box and check the connection places for each wire. There will be two hot wires, one ground and one neutral. In most cases, the neutral wire is not played any role, so cut it out if your compressor settings don’t need this.
Prepare your wires for connecting. Use a cutter to cut the rubber coating of the wires carefully. Then use a wire stripper to uncover the end of the wires and attach Solderless ring terminals on this or fork connector. Now you can unscrew the screws using a screwdriver and connect the line terminals to the switch housing and green wire to its respective ground point.
Secure the wires by tightening the screws. Fix the box cover at its place by screwing it in one place.
5. Test pressure switch
In the end, when you are done making all wire connections, then run a test. It is necessary to check its performance; if there is any issue running the air compressor, you can fix it at that time.
Safety tips to consider
Suppose you are dealing with such heavy electrical processes and equipment. You always need to consider preventive measures. If any mishap happens during the process, it will be dangerous for you and your costly equipment. Consequently, you should adhere to the advice provided below.
- Wear protective gear, such as gloves.
- Carefully press the main power button to turn it off.
- Check the colors of the wires and ensure that you are connecting the respective cables.
- Before attaching the wires, ensure these are covered or have appropriate insulation.
- Before starting the process, dry the space completely.
Last Words
A 22-volt air compressor could be a solution for working with multiple tools, but before using this, you must go through its connecting procedure. Wiring a 220-Volt air compressor to the power might seem daunting, but with proper knowledge and guidance, you can easily do it. All you require is this detailed manual. But if you are not an expert and are going to experiment for the first time, read and follow the safety measures.
FAQs
How to wire a 220 air compressor to 110?
After converting the voltage up to 110, you can connect these. 220 volts can be converted by attaching an adaptor. Insert this adaptor into the present 220volt outlet and alter this into 15 Amp outlets.
Does the 220 air compressor need a neutral wire?
220V air compressor does not need the usage of the neutral wire. However, the latest equipment might need an extra neutral wire to work correctly as they have a 120V regulator circuit.